Thursday, November 20, 2014

New Do New You!

          Recently I've been in a bit of a hair funk. I went pretty blonde back in June and haven't touched it since then.... I'm lazy and cheap! So my hair has been looking pretty damaged and brassy. So being the procrastinator that I am, I decided the end of them semester when all the work/ studying starts piling up was the PERFECT time for a hair shake up. I had been toying with the idea of going a whole lot shorter and just touching up the color, something a la Taylor Swift in the Shake it Off video or I LOVED Lo Bosworth's new short and sassy cut, however after the half mullet I was pretty scissor shy.


Well I plucked up my courage and headed to the salon and trusted my brand new hair dresser and came out looking like a whole new person! My hair dresser was super confident and made it really easy to trust her, so when she said going lighter would just damage my hair more, I just decided to go with whatever! I ended up going about 3inches shorter and a color I didn't expect but absolutely love. Maybe my bad hair curse has been broken? All I know is I know who I'm going to for my next haircut!

Before

After!

What do you think? Quite the change huh?

Friday, October 31, 2014

Doe A Deer!

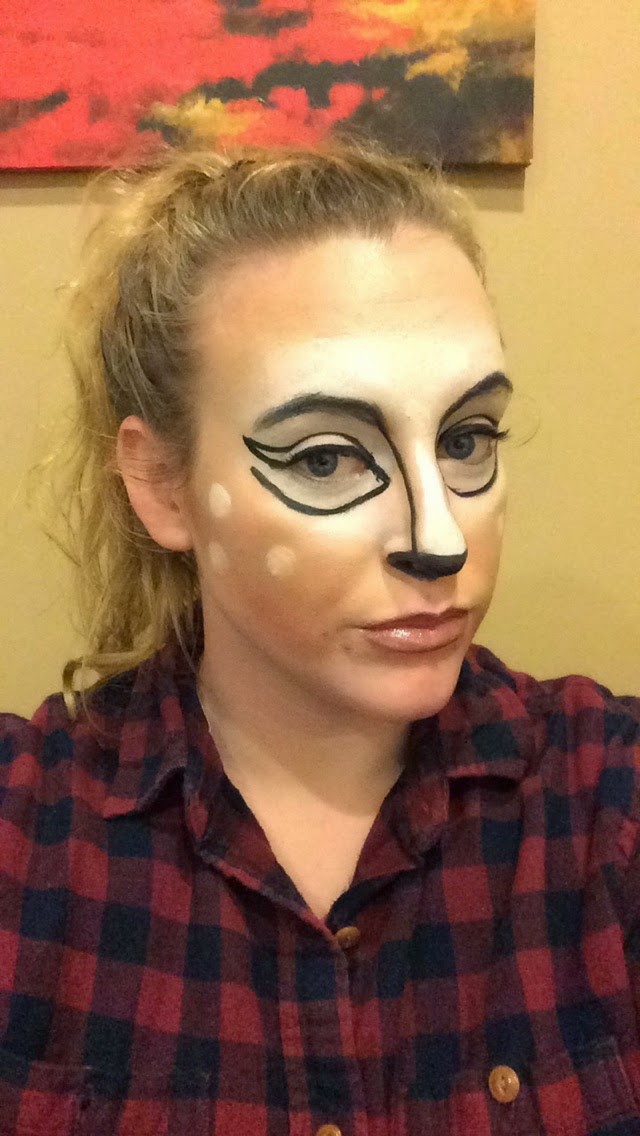
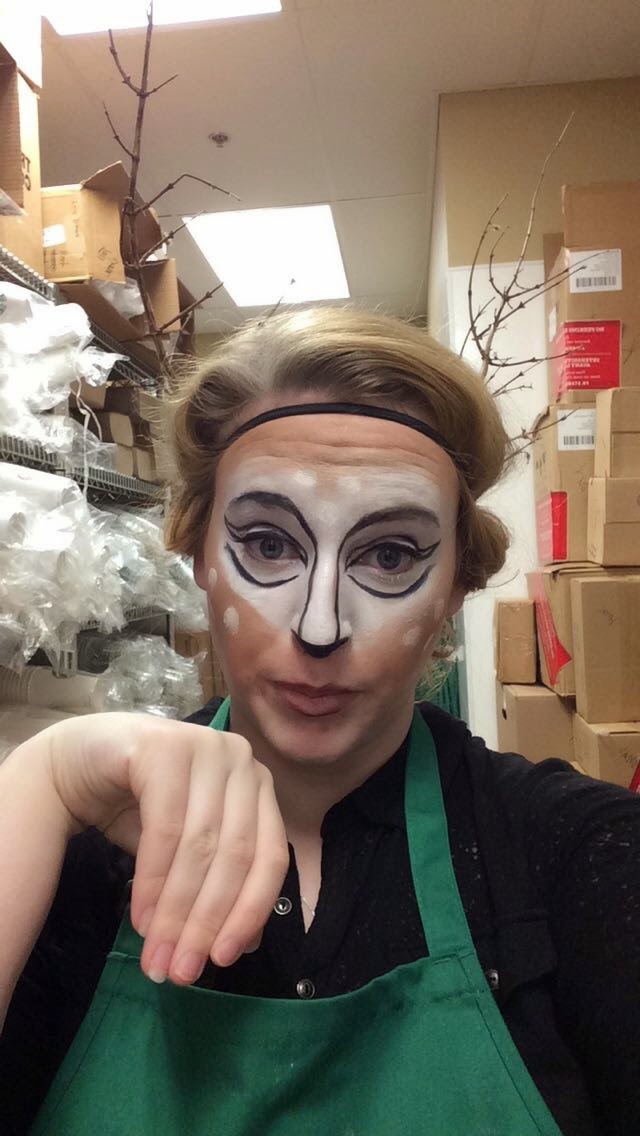
Hello Everybody! It's been awhile hasn't it? In the few months since I've blogged last, I have moved 3 times, written 3 midterms, gotten a new job, and have generally had an off computer life! Crazy how time flies huh? I thought i'd jump back into blogging with a halloween treat. I stumbled over this adorable deer tutorial on Pinterest maybe 3 days before halloween and it's surprisingly easy!


Above is my test run, seriously this look was shockingly easy!


and here's a selfie for good measure!


You'll need some sort of white cream base, I used an oil paint from the halloween store, not something I'd recommend as it is quite difficult to work with
bronzer
a contour color
black eye liner, I used gel liner
a brown lip liner
clear gloss
and finally some false lashes. The lashes are optional of course but i decided it was time to try new things and I have to say lashes are FUN!

Step 1: Use your white base and go over your eyes, nose, a bit of forehead, and the tops of your checks. On my test run i used my beauty blender and it wasn't as opaque as i wanted so the next day i tried my Real Techniques buffing brush. It was defiantly and improvement but i think my issue was with the product itself. 

Step 2: Use your bronzer on a large fluffy brush and go over the hollows of your checks, top of your forehead and temples

Step 3: Deepen the contour with a darker shade and add a slight contour to your nose

Step 4: Line your eyes with a thin line and bring it down a few cm out of the corner of your eye

Step 5: Arch the liner through the socket of your eye, creating an extreme cat flick and connect the line with the inner corner of your eye and the outer corner

Step 6: draw 2 lines down the sides of your nose and color in the tip

Step 7: Starting at the expanded line from the inner corner of your eye, make a curved line below your eye

Step 8: Add some mascara and if it pleases you some false lashes! Mine were pretty tame, I was doing this for work if i was going out i think i would want some more dramatic lashes.

Step 9: Add some white dots on your checks and forehead with your cream base

Step 10: Line your lips with a brown, I used a Rimmal scandal eyes eye shadow pencil, and smudge it out and add a clear gloss

Finally find yourself some antlers and your good to go! Hope you all like it!! 
What was everyone for halloween? It's one of my favorite holidays and i'm always looking for next years costume!


Sunday, July 20, 2014

Rose Gold Stole My Heart

From the moment I pressed the confirm purchase button I have been anxiously awaiting the arrival of the most beautiful makeup brushes in the world! Am I the only person who obsessively tracks packages? I think I checked the progress about three times a day... I was excited, don't judge! My obsessive browser refreshing was relieved earlier this week when these beauties arrived at my doorstep! The Zoeva Rose Gold Makeup brushes are finally mine!


I had been waffling for about 2 months (yes months), about wether or not I needed this set but really they are just too pretty not to own!


Opening this package, it just oozed luxury. The set came in a leather pouch with a rose gold zipper inside of a sleeper bag or dust bag as some call it.


All I want to do is run these over my face they are that soft! I'm loving the angled cheek brush and silk finish brush.


I really love the design of these brushes, the rose gold (obviously), the handles are thicker and feel very sturdy, they're shorter as well compared to my MAC and Sigma brushes, and I really love the Zoeva motto on the end of the handle as well! I think it's such a nice touch.

Sunday, July 13, 2014

High End vs Drug Store

I have been so loyal to my Maybelline Master Prescise Liquid liner pen for about two years now. I love how easy it is to use and how it NEVER seems to dry out. I always manage to make the perfect cat eye flick with this stuff. However I got tempted by Essie Button about a month ago when she started rocking navy liquid liner. I searched high and low for a drugstore navy liner pen and there are absolutely none. Frustrating right? So I popped into Sephora and picked up the Stila Stay All Day liquid liner. I thought I would show you a side by side comparison, my favorite Maybeline liquid liner vs the cult followed Stila pen!


The Maybelline pen has a longer and more tapered nib. It is thicker at the base and tapers off to a .02mm tip. Stila has a shorter nib, I assume to allow more control over the line, and it also tapers down to a .02mm tip.

With a shorter nib I find I have to use more strokes. As you can tell from the picture, this results in a bit of a choppy line. Personally I find that I get a smoother line with a longer nib, I like to lay the nib along my lash line and build from there. 

Stila Stay All Day

Maybelline Master Precise

I find the color inconsistent with the Stila liner as well. You can see the black line is quite a dark, true black throughout the line whereas the navy is a bit lighter on the start and end of the line, or the inner conner of my eye to the tip of the cat flick.


I'm also finding that the Stila liner is already starting to dry out, which is annoying as I bought it a month ago. I find it picks up my eyeshadow as I draw the line along my lid, which might be why it's drying out.

Overall I'm not to impressed with the Stila liner. I love the color if it was a bit more even. I'd jump for joy if Maybelline brought out my "Old Faithful" in some addition colors! Anyone know where I can find a drugstore liquid liner pen in navy? This isn't cutting it!

Saturday, July 5, 2014

In My Glory, Soap & Glory!

Well I'm finally here with my Soap & Glory review! A bit of a long time coming I know, but I wanted to make sure i'd given the products enough of a test time so I could give you an honest opinion. So my mother and sister went to Africa about a month and a half ago and they stopped over at Heathrow Airport. So being the beauty addict I am, instead of a souvenir tshirt I requested a list of Soap & Glory products I couldn't get ahold of in the States. From my list of 5 I got the two most important on the list! The Ultimelt hot cloth cleanser and the No Clogs Allowed self heating deep detox mask (what a mouthful THAT name is!).


First up is the Ultimelt,  and let me say this is my favorite of the two. Put this baby on, massage it into your skin on a full face of makeup and it literally melts it away! I have been loving this to take off my makeup at night and i'm about 1/2 way through the tube already. I'm seriously concerned about how I'm going to go about getting another bottle of this since I'm already addicted.


I was wearing the Bennifit They're Real Mascara in the day these were taken and that stuff is notoriously difficult to get off... as you can tell by my raccoon eyes The Ultimelt was up to the job! I also found that my eyelashes were softer after using this cleanser. Not what they market it for but I was happy with the side effect. I was really happy that this didn't break me out as that had been happening with most cleansers I had been trying and my skin felt really clean and soft after this.

Now the No Clogs Allowed, I was really excited about this for the self heating part of the mask. It really is warm! The tube says to shake the mask before applying which I found a little difficult as it is a pretty thick product and in a tube so not exactly conducive to shaking. However I did what I could! The mask comes out a light green color and is a weird texture. It's chalky and grainy and a bit lumpy.


I could feel the mask heating when I first applied it to my skin, I paid close attention to my nose to get at those pesky blackheads when smoothing it on for the first time. Next you wet your hands and scrub some more! The mask heats again and is supposed to turn blue to let you know when to stop but i haven't seen that happening. It really buffs away dead skin and after this is off my face feels like a baby's bottom!! Overall a great product as well! I'm not going through it as quickly as the Ultimelt because I only use it once or twice a week.


Soap & Glory really need to get their act in gear and sell the full line of products in the States and Canada! I was in New Brunswick a few days ago and hit up Shoppers thinking I'd be able to find some but they have the same products Sephora has here. Needless to say I was disappointed.

Saturday, June 14, 2014

Taking Time to Smell the Flowers

A new outfit post for you today! We got this dress into the store a few weeks back and I fell in love as soon as I tried it on! I never thought I would like the midi length trend but I think this dress is actually really flattering. I'm not to keen on spaghetti straps though, so I paired it with this denim vest I picked up last year from the Levi outlet, I love the asymmetrical studding detail and it goes with literally everything!


To accessorize I'm wearing my gold coin necklace from Forever 21, which was in my May Favorites post, and my navy purse from Target. Also from Target are these cork wedges which were only $35 and are really comfortable!


     Whats on my face: Makeup Forever HD foundation in 110, MAC Peachykeen blush, Rimmil Stay Matte Powder, Hourglass Arch Brow Sculpting Pencil in Blonde, and YSL Rouge Volupte Shine in Color 8 Pink in Confidence, Stila Liquid Liner in Midnight    

I have been loving the milk maid braids as an easy, cute hairstyle and it's perfect for work as I don't have to worry about hair in my face all day. It's super easy to do and take about 5 minutes which is a win in my book! I honestly hate doing my hair and anything quick and easy is usually what I fall in love with, hairstyle wise.


This has been my go to work look recently, it's so easy to throw on and look chic! It's always a really easy dress to style differently as well, I've worn it with a chambray shirt instead of the vest and this dress looks great with flats too! I feel really confident while wearing this and thats what you strive for when getting dressed right? Anyone else have that one item in your closet you know you feel confident in?


Another PS: I know I said last week I would be doing a review on my new Soap and Glory goodies and I will! I'm just giving them a good test run first!

Saturday, June 7, 2014

Candles, Candles, Everywhere!

Anyone else have a candle burning addiction? I love Bath & Body Works candles and with this love comes a huge amount of empty candle jars. I've been leaving them laying around thinking that there may be a use for them sometime, and low and behold there is!

I was on the hunt for some cute way to store my cotton ovals that I use to take my makeup off and then thought, why buy something when you can make it yourself? So I did!

You'll need an empty candle jar, lid, hot glue, and a adornment for the top


Step 1: Find the center of your candle lid and heat up the hot glue
Step 2: Glue center of the adornment, I used drawer handles from target, and immediately place it on to the middle of the lid


Step 3: Let the glue dry overnight, I made the mistake of thinking an hour would do and took managed to take the handle off again.

Now you have a super easy and cute jar to store whatever you'd like! I think this would be great for bracelets and necklaces too!


I also use empty candle jars to hold my makeup brushes, you can customize them with paint or glitter. Right now mine are boring with just some craft beads at the bottom to give the brushes something to stand in. I love easy, cute DIY's. Do you have any ideas on what I can do with the rest of my empty jars? I have a few!

            Also just as a little incentive to stay tuned, my mother just got back from a trip to South Africa and when she stopped over at Heathrow she picked me up some Soap and Glory goodies! I tried them tonight and there may be a review next Saturday!!